
Ceramic tiles are a popular and versatile option for flooring and wall surfaces in homes and offices. They are durable, easy to clean, and come in a wide range of designs and colors to suit any interior style. But the struggle comes in laying the ceramic tile for installation.
For laying ceramic tile, prepare the surface by cleaning and leveling. Measure and mark the layout, ensuring straight lines. Apply thin-set mortar, then press tiles evenly, adding spacers. After drying, remove spacers and apply grout diagonally. Wipe off the excess for a nice finish. Let it cure.
If you’re looking to enhance the beauty and functionality of your space by installing ceramic tiles, this step-by-step guide will discuss how to lay ceramic tiles. So stay with me.
How To Lay Ceramic Tile: Follow The 7-Step-by-Step Process
For laying ceramic floor tiles, you need to follow the right process to avoid any mess. From my experience, I am here to explain the process to you. Have a look.
Step 1: Prepare the Surface
Proper preparation of the surface is essential for a successful tile installation. Start by cleaning the floor or wall to remove any dirt, dust, or debris. Repair any cracks or uneven areas and allow them to dry. If you are tiling a floor, consider applying an underlayment or backer board to create a stable and level surface.
Step 2: Layout and Marking
Begin by planning the layout of your tiles. Measure the area to be tiled and find the center point. Use this point as a starting point for laying tiles. Create layout lines with a chalk line to guide you during installation. Dry lay some tiles along these lines to ensure you are happy with the design and make adjustments if necessary.
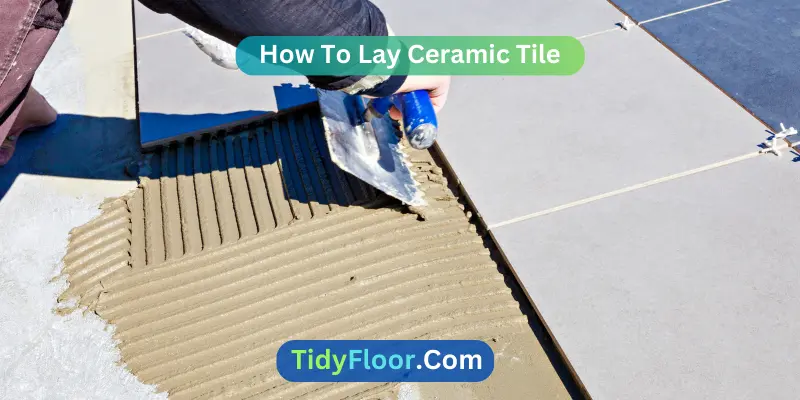
Step 3: Apply the Tile Adhesive
Using a notched trowel, spread a thin layer of tile adhesive on a small section of the surface, starting at the center point. Hold the trowel at a 45-degree angle to create ridges in the adhesive. This will help the tiles adhere properly and ensure an even surface. Work in small sections to prevent the adhesive from drying out before you can lay the tiles.
Step 4: Lay the Tiles
Carefully place the tiles on the adhesive, following the layout lines. Press each tile firmly into the adhesive and wiggle it slightly to ensure a good bond. Use tile spacers between tiles to maintain even gaps for grouting. Continue this process, working in small sections at a time, until all the tiles are laid.
Step 5: Cut Tiles to Fit
Inevitably, you will encounter areas where full tiles won’t fit. To accommodate these spaces, measure the area that needs a smaller tile, and use a tile cutter or tile saw to make the necessary cuts. Take accurate measurements and make precise cuts to achieve a professional finish.
Step 6: Grouting
Once the adhesive has dried and the tiles are firmly in place, it’s time to apply the grout. Mix the grout according to the manufacturer’s instructions and use a grout float to spread it over the tiles, pressing it into the gaps. Wipe off any excess grout with a damp sponge before it dries on the tile surface.
Step 7: Final Touches
Allow the grout to dry for the recommended time, typically 24 to 48 hours. Once dry, clean the tiles and polish them with a soft cloth to remove any grout haze. Replace any removed baseboards or trim, and your ceramic tile installation is complete!
8 Tips About How to Lay Ceramic Tile for Beginners: Easy Steps
Laying ceramic wall tiles or floor tiles may seem daunting for beginners, but with some essential tips, you can tackle the project with confidence:
- Start with a Small Area:
If you’re new to tiling, begin with a small area like a bathroom or entryway. This allows you to gain experience without feeling overwhelmed by a large space.
- Choose the Right Tiles:
Opt for standard-sized tiles for your first project. They are easier to handle and require less cutting. Ceramic tiles are a great choice for beginners due to their versatility and ease of installation.
- Invest in Quality Tools:
Having the right tools makes a significant difference in the outcome. Invest in a good-quality notched trowel, tile cutter, and tile spacers to achieve precise and even results.
- Plan the Layout Carefully:
Take your time to plan the tile layout before applying adhesive. Start from the centerline or focal point and use chalk lines as guides to maintain straight rows.
- Check Tile Alignment and Level:
As you lay the tiles, periodically check their alignment and level. Adjust as needed to ensure a professional finish.
- Be Patient with Cutting:
Cutting tiles may be intimidating at first, but take your time and be cautious. Measure accurately and practice cutting on spare tiles before making cuts on your actual tiles.
- Allow Sufficient Setting Time:
Once all the tiles are laid, allow the adhesive to set for the recommended time before grouting. Rushing this step may compromise the integrity of the tile installation.
- Take Care While Grouting:
When it’s time to grout, ensure the gaps are clean and free of debris. Use a grout float to apply grout evenly, and remove excess grout promptly with a damp sponge.
6 Mistakes to Avoid When Learning How to Lay Ceramic Tile in a Bathroom
When tackling a bathroom tiling project, it’s crucial to avoid common mistakes that can lead to costly and time-consuming issues. Here are some key pitfalls to steer clear of:
- Choosing the Wrong Tiles:
Select tiles specifically designed for bathroom use. Avoid using porous or unglazed tiles, as they are susceptible to water damage and staining. Opt for ceramic or porcelain tiles with low water absorption rates for increased durability.
- Incorrect Adhesive Application:
Using the wrong type of adhesive or applying it incorrectly can lead to tiles not bonding properly or lifting over time. Always follow the manufacturer’s guidelines for adhesive selection and apply it with a notched trowel for even coverage.
- Rushing the Tile Installation:
Tiling in a hurry can lead to misaligned tiles and an overall sloppy appearance. Take your time to ensure the tiles are evenly spaced, level, and properly aligned with the layout.
- Neglecting Expansion Joints:
Bathrooms are susceptible to temperature and moisture fluctuations, which can cause tiles to expand and contract. Failing to include expansion joints can result in cracked tiles or grout lines.
- Using Too Much Grout:
Excessive grout in between tiles can create a messy look and make cleaning more challenging. Use the right amount of grout, and ensure it is evenly applied in the gaps between tiles.
- Not Sealing Grout:
Neglecting to seal grout leaves it vulnerable to stains, mold, and mildew. After allowing the grout to cure, apply a high-quality grout sealer to protect and prolong its lifespan.
FAQs:
Can I Lay Ceramic Tiles Over Existing Flooring?
In most cases, it’s not recommended to lay ceramic tiles directly over existing flooring. The old surface may not provide a suitable substrate, leading to future tile failure. Proper preparation, including removing old flooring and ensuring a clean, level surface, is crucial for a successful tile installation.
How Do I Know Which Type Of Adhesive Or Thin-Set Mortar To Use To Lay Ceramic Tile?
The choice of adhesive or thin-set mortar depends on the tile type, the surface being tiled, and the environmental conditions. For standard ceramic tiles, a cement-based thin-set mortar is commonly used. For large-format or porcelain tiles, it’s best to use a latex-modified mortar for increased flexibility and bond strength.
Can I Lay Ceramic Tiles In Wet Areas Like Bathrooms Or Kitchens?
Yes, ceramic tiles are suitable for wet areas, but proper waterproofing is essential. Use a waterproofing membrane on walls and a waterproof underlayment for floors to prevent water damage. Additionally, choose grout with waterproofing additives to enhance moisture resistance.
How Do I Achieve A Straight Tile Layout?
To achieve a straight layout, start by establishing a centerline or focal point. Use chalk lines as guides to ensure straight tile rows. Always use tile spacers to maintain consistent grout lines and check tile alignment regularly using a level.
What Tools Do I Need To Cut Ceramic Tiles For Laying?
For cutting ceramic tiles, you’ll need a tile cutter for straight cuts and a wet saw for more complex cuts, like curves or notches. Both tools are readily available for rent at most home improvement stores.
How Long Should I Wait Before Grouting The Ceramic Tiles?
Allow the tiles to set in the adhesive or thin-set mortar for at least 24 hours before grouting. This timeframe may vary depending on the product used, humidity, and temperature. Follow the manufacturer’s instructions for the recommended setting time.
Is It Necessary To Seal Ceramic Tiles After Laying?
Glazed ceramic tiles do not require sealing, as the glaze acts as a protective layer. However, unglazed or porous ceramic tiles should be sealed to prevent stains and moisture absorption. Always use a penetrating sealer suitable for the specific type of tile.
Can I Walk On Newly Installed Ceramic Tiles Immediately?
It’s best to avoid walking on newly installed tiles until the adhesive or thin-set mortar has fully cured. Even though the tiles may feel secure, premature foot traffic could shift or dislodge the tiles. Follow the recommended curing time before using the tiled area.
How Do I Clean And Maintain Ceramic Tiles After Laying?
Regularly sweep or vacuum to remove dirt and debris. Clean the tiles with a mild detergent and warm water using a soft mop or sponge. Avoid harsh chemicals that may damage the grout or tile surface. For stubborn stains, use a gentle tile cleaner and follow the manufacturer’s guidelines.
Can I Lay Ceramic Tiles On A Wooden Subfloor?
Yes, but proper preparation is crucial. Use a cement backer board or an uncoupling membrane over the wooden subfloor to provide a stable and moisture-resistant surface for the tiles. Follow the manufacturer’s recommendations for the appropriate installation method.
Conclusion
Learning how to lay ceramic tile is a rewarding and achievable DIY project that can transform the look and feel of your living spaces. By following this step-by-step guide, you can confidently install ceramic tiles like a professional.
Remember to take your time, plan your layout carefully, and pay attention to details for a stunning and long-lasting result that will enhance your home’s beauty and value. Happy tiling!